
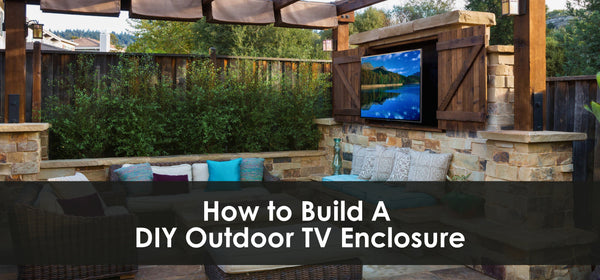
How to Build A DIY Outdoor TV Enclosure
Do you already have an outdoor TV lift? Great—now take it a step further.
A DIY outdoor TV enclosure adds extra protection by shielding your setup from rain, dust, and extreme weather while keeping your motorized lift running smoothly.
The best part? Building your own enclosure is easier than you think and saves you money.
So, keep reading for simple, step-by-step instructions on how to build a DIY outdoor TV enclosure—because your outdoor setup deserves protection as sleek as your TV lift.
What Is a DIY Outdoor TV Enclosure and Why Build One?


A DIY outdoor TV enclosure is a custom-built housing designed to protect a television in an outdoor setting.
It shields the TV from weather elements like rain, snow, sun, and wind while still providing a high-quality viewing experience.
By building it yourself, you can design the enclosure to match your outdoor style, which can save money compared to buying ready-made boxes.
When integrated with a TV lift mechanism, you can hide the TV when it is not in use, adding extra safety and a neat look.
This makes your overall outdoor entertainment setup look nice and helps you watch the TV at the best height.
Now, let’s go over the first step to get your DIY outdoor TV enclosure ready.
Step 1. Planning Your DIY Outdoor TV Enclosure
Before building your DIY outdoor TV enclosure, a solid plan is essential. The right preparation ensures your TV fits perfectly, stays protected from the elements, and blends seamlessly with your outdoor space.
Here’s what you need to go over before getting started.
A. Assessing Your Space and TV Size
Choosing the right location is as important as picking the right materials. Before starting, measure your TV and determine the best spot for your outdoor LCD TV enclosure.
-
Sunlight Exposure: Avoid direct sunlight to reduce glare and prevent overheating.
-
Viewing Angles: Pick a height and angle that is comfortable for watching TV.
-
Available Space: Ensure the enclosure fits securely without obstructing movement or clashing with other outdoor furniture.
For larger setups, consider outdoor video wall lifts for a sleek, space-saving solution.
B. Material Selection
Choosing the right materials is crucial for a weatherproof outdoor TV enclosure. The materials you pick determine how long your enclosure lasts and how well it protects the TV.
-
Pressure-treated wood – Resists rot and insects. Ideal for the frame.
-
Plywood (Exterior Grade) – Offers a smooth surface for the back and sides. Marine-grade plywood is excellent but more expensive.
-
Weather Stripping – Seals the edges to prevent water intrusion.
-
Exterior-grade screws – Prevent rust and ensure secure connections.
-
Polycarbonate or Tempered Glass – Offers protection and clear viewing for the front door.
C. Tools Required
Having the right tools makes the building process smoother. Gather these essentials to construct a waterproof DIY outdoor TV enclosure.
-
Saw (circular or table saw) for cutting lumber and plywood.
-
Drill, drill bits, and screws for assembling the frame and attaching panels.
-
Level to ensure the enclosure is straight and even.
-
Measuring tape for accurate measurements.
-
Weatherproof sealant to keep moisture, dust, and debris out.
-
Safety glasses and gloves for personal protection.
Step 2. Building the TV Enclosure
Now that you’ve planned your setup, it is time to bring it to life. Follow these steps to create a durable frame, secure the panels, and add proper ventilation.
A. Constructing the Frame
A strong, well-built frame is the backbone of your DIY outdoor TV enclosure. If you plan to integrate TV cabinet lifts, panel lifts, hidden TV lifts, projector lifts, or even ceiling lifts, a precise frame ensures seamless operation and a polished look.
-
Cut the plywood according to your outdoor TV enclosure building plans. Measure twice to avoid costly mistakes.
-
Assemble the frame using pressure-treated wood for durability against moisture and pests.
-
Secure joints with wood glue and screws to reinforce the structure and prevent shifting over time.
-
Check the alignment with a level to ensure stability and a perfect fit for the enclosure.
B. Adding the Back and Sides
Once the frame is ready, it’s time to enclose your DIY outdoor TV enclosure. The back and sides provide structural support and will shield your TV from harsh weather.
-
Attach the back panel with screws to secure the structure and reinforce stability.
-
Install the side panels using hinges for easy access when adjustments or maintenance are needed.
-
Apply weatherproof sealant to all joints to prevent moisture from seeping in and damaging your TV.
C. Creating the Front Access Door
The front access door is a key part of your TV enclosure. It lets you easily open and close the enclosure while protecting the TV from weather and debris.
-
Cut a front panel from plywood, making sure it fits securely and aligns with the frame for a clean, professional look.
-
Attach cabinet doors using bi-fold doors or double doors to provide easy access without taking up extra space.
-
Install hinges and latches to keep the door sturdy, weatherproof, and secure against wind and unwanted movement.
D. Ventilation and Cable Management
Without airflow, your TV can overheat, reducing its lifespan. Poorly managed cables can create a mess or even a fire hazard. Taking a few extra steps now guarantees a safe and long-lasting setup.
-
Drill ventilation holes on the sides to allow proper airflow and prevent overheating.
-
Install screens over the vents to block out pests and debris while maintaining circulation.
-
Organize cables neatly with hooks and ties to prevent tangling and accidental disconnections.
Step 3. Finishing and Installation
Now that your enclosure is built, it’s time to add the finishing touches. Follow these final steps to protect your TV and create a polished, functional setup.
A. Weatherproofing and Painting/Staining
A DIY outdoor TV enclosure is only as good as its ability to withstand the elements. Exposure to moisture, heat, and UV rays can weaken the structure over time without proper protection.
-
Apply exterior-grade stain or paint to protect the wood from water damage and UV exposure. Choose a weather-resistant finish that complements your outdoor space.
-
Seal gaps with weather stripping and caulk to keep out rain, dust, and insects. Focus on edges, joints, and screw holes where moisture is most likely to seep in.
-
Allow drying time before installing the TV. Let the paint and sealant cure for at least 24 hours to prevent chipping or warping.
B. Mounting the TV and Enclosure
Now, let us get that TV mounted.
Lifting and mounting a TV is a two-person job, so get assistance before beginning.
Next, double-check your measurements. You don’t want to re-drill holes later.
Use a sturdy TV mount that fits your TV's VESA pattern. Attach the mount to the inside back panel of your enclosure, making sure it is dead center.
Carefully lift the TV and attach it to the mount. Listen for that satisfying click.
Secure the entire enclosure to the wall or chosen surface. Use wall anchors if needed. You want it rock solid; a wobbly enclosure is a no-go.
C. Integrating Auton Motorized Lifts
A DIY outdoor TV enclosure protects your screen, but pairing it with an outdoor TV lift takes convenience to another level.
The Auton Model BG-PS-75 Outdoor TV Lift-Swivel Mount lets your TV rise into view when needed and retract when not in use. With its 360-degree swivel, you can adjust it to the perfect viewing angle, making outdoor movie nights even better.
It is a seamless way to protect your screen while keeping your space sleek and clutter-free.
Step 4. Maintenance Tips for Your DIY Outdoor TV Enclosure


Building your DIY outdoor TV enclosure is just the beginning. Regular maintenance is key to keeping it in top shape and ensuring your outdoor entertainment runs smoothly.
A. Regular Inspections
Outdoor exposure means your enclosure faces rain, wind, and temperature shifts, all of which can cause gradual wear.
-
Check regularly for wear and tear, including cracks, water damage, or loose screws that might weaken the structure.
-
Inspect the weatherproofing by looking for peeling sealant or gaps where moisture could seep in. Reapply sealant as needed.
B. Seasonal Care
Your outdoor TV setup needs different care depending on the time of year. When winter comes and temperatures drop, you’ll need to take extra precautions.
In very cold areas, consider insulating the enclosure. Foam insulation or even a blanket can help keep the TV warm.
If it gets below freezing, it might be best to remove the TV and store it indoors.
In summer, the heat can be damaging. Monitor the temperature inside the enclosure and add more ventilation if needed. A small fan can make a big difference.
Clean the enclosure every few months to remove buildup from dirt, insects, and moisture. A quick wipe-down with a damp cloth will keep it looking its best.
Frequently Asked Questions (FAQs)
How Do I Prevent Condensation Inside the DIY Outdoor TV Enclosure?
To prevent condensation, maintain the temperature inside the enclosure above the dew point. This can be achieved through proper ventilation. Alternatively, consider using a small dehumidifier inside the enclosure.
What Type of Wood Is Best for Building a DIY Outdoor TV Enclosure?
Pressure-treated wood, marine-grade plywood, or composite materials are ideal. These materials resist moisture, insects, and temperature changes, extending the enclosure’s lifespan.
How Can I Protect the DIY Outdoor TV Enclosure From Pests?
Use a weatherproof cover to keep out moisture, dust, and insects. Seal any gaps in the enclosure and ensure proper ventilation.
Key Takeaways on How To Build A DIY Outdoor TV Enclosure
Building an outdoor TV cabinet is more than just a weekend project—it’s an investment in your entertainment space. The right materials, smart planning, and careful installation will ensure your setup lasts for years.
Before grabbing your tools, here’s a quick recap of what matters most:
-
Measure your TV and plan carefully.
-
Use durable, weather-resistant materials.
-
Ensure proper ventilation and cable management.
-
Weatherproof the enclosure with sealant and paint.
-
Securely mount the TV and enclosure for safety.
A DIY outdoor TV enclosure is a cost-effective way to enjoy entertainment outdoors while protecting your TV. If you want a more advanced solution, check out Auton Motorized Systems.